
|
||||
Creating Multimedia PresentationsA Guide for those using PowerPoint 97OverviewThis document is aimed at those who wish to use PowerPoint to create Interactive Multimedia Presentations. A basic familiarity with both Windows95 and Microsoft Office is assumed. This document is not intended to be a PowerPoint tutorial. The emphasis in this document is on the procedures required to create such presentations and the practicalities of giving multimedia presentations. The final chapter includes some thoughts on style and suggestions for further reading.ConventionsThroughout this document the following conventions are employed: Bold text relates to text that appears on the screen Italic text relates to terms explained in the Glossary San Serif text indicates text that the user entersIt is assumed that the reader is using at least a 486DX2-66 computer with Windows 95 and PowerPoint 97 installed. A sound card is essential for the use of multimedia clips, a presentation can be created without one but it will be impossible to check the way a presentation will sound. MultimediaIntroductionIncluding sound and video files in a presentation can be an effective way of drawing attention to points you wish to make. This chapter explains the basic procedures involved in inserting such files into PowerPoint slides either as Media or as an embedded OLE object. The practical distinction between these two methods lies mainly in the way they are handled by PowerPoint, and in general the first method is preferable. A Media file is played internally by PowerPoint whilst for an OLE object although the file appears to run within the sideshow PowerPoint in fact loads an external application, the OLE server, to play the file. If the file is not recognised by Powerpoint embedding it as a OLE object allows its use.File Formats.Before starting work on a presentation some thought must be given to the file formats to be used for the Multimedia files, the table below list the main sound and video formats and whether or not they are supported by PowerPoint.
ActionMovie is a add-in for Windows that is provided freely by Microsoft with their Internet Explorer Browser. The QuickTime player can be obtained from Apple. The video digitising service provided by the Manchester Visualisation Centre can produce both MPEG and, after conversion, AVI files. Details of how to arrange video digitisation are available from MVC.
Inserting MediaThe section describes how to insert multimedia files using PowerPoint’s Insert Movies and Sound feature. After selecting the appropriate slide select the Insert menu and chose the option Movies and Sounds, a sub menu opens allowing the type of media file to be specified. To insert an external file choose either Movie from File ... or Sound from file ... A standard windows file open box will appear which will allow a media file to be selected. Once the file has been chosen it will appear on the slide as a bitmap, either of the first frame of the movie or as a icon. The icon depends on the type of sound file imported. Preventing an icon from displaying in an application is described in section 3.2. In addition to sounds and movies it is possible to insert a reference to a music CD track by choosing Play CD Audio Track... this brings up the dialog shown below: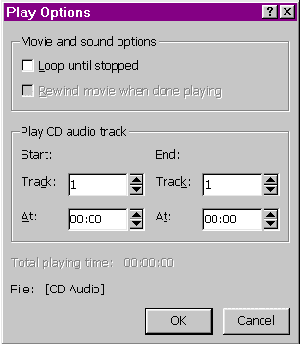 Figure 2.1 This allows the track, and the time position within a track for the start and finish of the music to be set. Naturally for a presentation with an embedded CD track to work the relevant music CD must be in the CD drive during the presentation. Inserting OLE ObjectsEnsure that you have selected the slide on which you wish to insert a multimedia file, then chose the Insert menu and choose Object... The dialog box pictured below will appear. Figure 2.2 As Multimedia files are invariably already prepared you then need to select the Create from file radio button, this will change the dialog box to that pictured below. 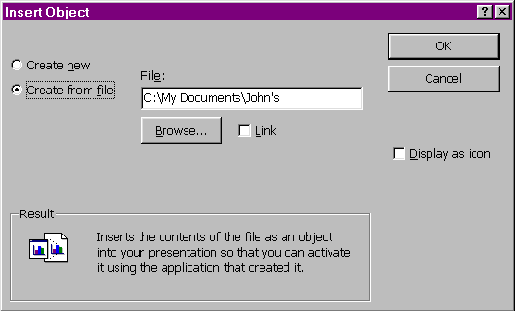 Figure 2.3 Ensure that the link box is cleared, this is not an appropriate option for multimedia files. Linking inserts just a picture of a files contents which is updated when the original file is changed, while for a media file to be usable it must be inserted as an OLE object. Click the Browse... button and use the standard file dialog box to locate the desired file if you do not know its full path and filename. Once selected the name of the file will appear in the box above the browse button, the final remaining choice is whether the file should appear as an icon or not. This option has no effect for sound files which always appear as icon. If this box is checked for a video file, an icon, rather than the first frame of the video, will appear on the slide. To insert the file click the OK button. Animating SlidesIntroductionPowerPoint97 provides a range of animation features. This section describes how to alter the way the transitions between slides are handled. In addition the range of animation effects that can be applied to an individual slide are described.Slide TransitionsThe slide transition properties of a slide can be accessed by choosing the Slide Show menu and selecting Slide Transition... . The dialog box shown below will then appear.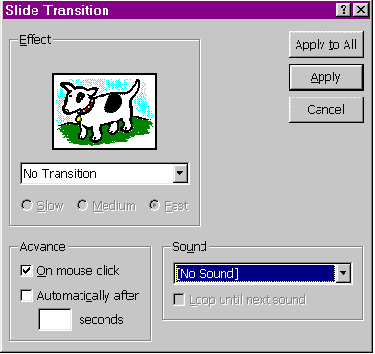 Figure 3.1 The top left hand of the box allows the transition effect to be chosen and previewed by clicking on the picture. This effect applies for transitions to the current slide. Turning off both the On mouse click and Automatically after check boxes in the Advance section is useful for creating an interactive presentation as it means that just hyperlinks can be used to navigate around a presentation. The background sound can be specified in the Sound section, the pull down box lists all the default PowerPoint sounds, a different sound may be chosen by selecting Other File... Check the Loop until next sound box if you wish a sound to continue until the next sound effect starts. 3.3 Setting the animation on a slideText, Media and objects on a slide may be animated in PowerPoint using a variety of effects. For example, a sound or movie can be set to run in the background while text is introduced bullet by bullet. Sound effects can be attached to each individual animation effect. The range of options is very wide, it is important not to get carried away to the point where the effects distract from the message of a presentation. To set up animation for an object on a slide, right click on the object to bring up the context sensitive menu and choose Custom Animation... a dialog box will appear.The first tab, Timing, allows the selection of the objects to be animated, select an object in either the preview windows or the Slide objects without animation box and click the Animate radio button. Then choose whether the animation proceeds by mouse clicks or automatically by setting a delay. The order in which objects animate can be changed by selecting an object in the Animation order box and using the arrows to move it up or down. The next tab, Effects allows the way in which an object is to be introduced to be altered. If a sound file which appears on the slide as an icon is not to appear ensure that it is set to no effect and that the Hide when not playing check box on the Play Settings tab is checked. 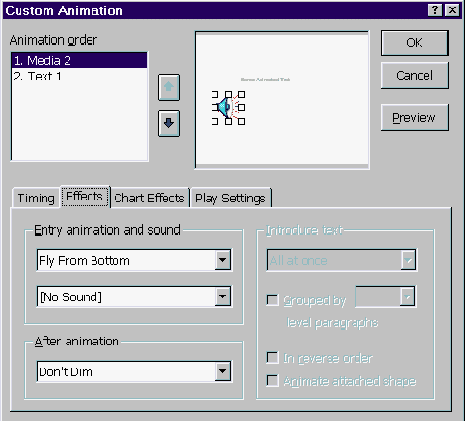 Figure 3.3 The entry animation types are self explanatory and can be previewed by clicking Preview, the second pull down box can be used to attach a digitised sound to the animation of a particular object. The Introduce text section allows text to be introduced by word or letter if so desired. The After animation box allows a colour to be attached to the text that will apply after it has been animated. This box also allows text to be hidden after animation. The Chart Effects tab is not discussed here as it is beyond the scope of this document. The Play Settings tab is important for inserted media and OLE objects. The left hand box of the tab will be available for objects inserted as media, and allows a media object to play as it is animated. The radio buttons control whether the media object will play in the background or whether the slide show will pause until the clip is played. The More Options button brings up a further dialog which allows features specific to the various media type to be altered. If a multimedia file is inserted as an OLE object then the Object action box must be set to Play if the file is to be play automatically in the slide show. The left hand options are not available for OLE objects which is why it is recommended that wherever possible files are inserted using Insert Movies and Sounds rather than Insert Object as described in Chapter 2. Previewing a Slide ShowOnce you have configured the animation for a slide show it is a good idea to preview the show by changing the view to Slide Show using the View menu. The slide show should then run and the hyperlinks and media links can be tested. To return to Slide View click the right mouse button and choose End Show from the context menu.A Guide for those using PowerPoint 97 - HyperlinksIntroductionA Hyperlink is the generic term given to an entity on a slide that links to another object. For example the viewer of a presentation can, by clicking on hypertext links, navigate a presentation. One common use of hypertext is to provide a feature where clicking on a jargon word in a document brings up its definition. This chapter describes how to create buttons which trigger actions and how to turn normal text into hypertext.Action SettingsActions are attached to objects using the Action Settings... command, this is accessed from the context sensitive menu for an object. The Action Settings dialog box is shown in figure 4.1: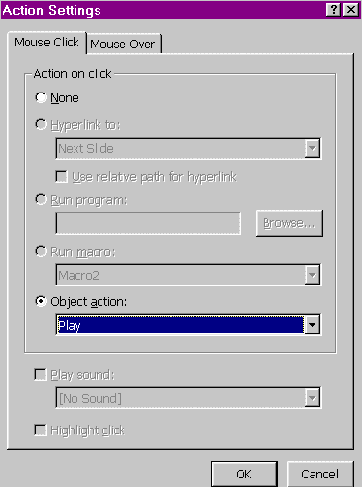 Figure 4.1 Using this box the function of the object in response to a mouse click may be defined, similarly changing to the Mouse Over tab allows the response of an object to the mouse moving over it to be defined. There are three options that are of use in this context, Hyperlink to, Run Program and Play Sound, as Object Action only applies to OLE objects (dealt with in Chapter 2) and the creation of Macros is beyond the scope of this document. By checking the Hyperlink To radio button and changing the setting in the Hyperlink: field the button may be made to link to a variety of objects. These are listed below in figure 4.2 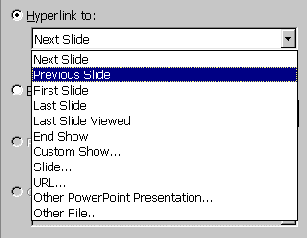 Figure 4.2 The first few options are self explanatory, involving linking to other slides. Custom Show... is a feature of interest only to more advanced users and a description of it is beyond the scope of this document. The Slide ... Option brings up a dialog which allows a particular slide to be specified. The URL... option allows a web page to be specified, if this option is set your default browser will be started by PowerPoint and will display this Web Page. Other PowerPoint Presentation allows slide shows to be chained. Other File... is useful as it can be used to run a multimedia file, or indeed open any file if the appropriate application is available. If a multimedia file is referenced in this way it will play in a separate window rather than embedded in the slide. The previous chapter describes how to insert media files directly into a slide. Caution needs to be exercised when using this option as the file referred to will not be included in a Pack & Go.. presentation (described later). If the PowerPoint (.ppt) file is transferred to another computer the media file must also be copied. Run Program... allows the browser of a PowerPoint presentation to launch an external application. An example would be the following command to play a music CD in drive D: starting at track 4 : cdplayer.exe /play D:\TRACK04.CDA 4.3 Creating Action ButtonsThe simplest option available in PowerPoint for adding navigation to your presentation is by the use of Action Buttons. These are predefined shapes that can be placed on a slide and act just like a button in a dialog box. The figure below shows some of the default button styles available. Figure 4.3 Action buttons are accessed from the Slide Show menu, the option Action Buttons will bring up a sub menu, from which a button style may be selected. These buttons can be placed and resized like any object, in addition to the standard controls a small yellow diamond appears in the slide view to the top left of the button. Dragging this control allows the relative size of the top and sides of the button to be changed. Examples of this are shown below:  Figure 4.4 The colour scheme for a button can be altered by using the right mouse button to access the context menu. By choosing Format AutoShape.. the properties of the button may be altered. In the dialog below by clicking on the Colour box a new colour may be selected, PowerPoint automatically shades the button edges 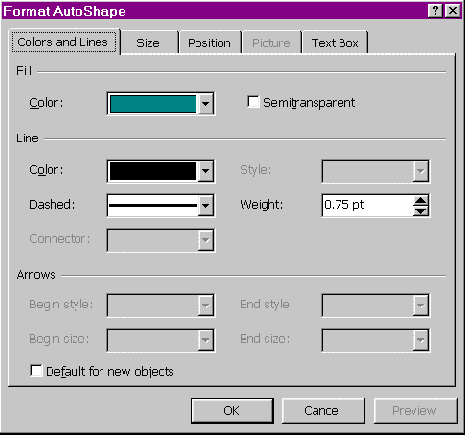 Figure 4.5 If a text legend is to be added to a blank button the option Add Text should be selected from the context menu, text can then be typed into the button. An example of a text button is shown below:  Figure 4.6 Once a button has been placed its function must be defined, the dialog shown in figure 4.1 will appear as a button is inserted, if you do not wish to immediately specify a buttons properties this click Cancel. The box may be recovered by right clicking on the action button and choosing Action Settings... from the context menu. Some of the buttons have default functions attached to them, for example the home button returns to the first slide and the U turn button goes to the last viewed slide. These default functions can easily be changed if desired. A description of the Action Settings... dialog box, which applies to both Action Buttons and Hypertext is given in Action Settings Creating HypertextTo make a section of conventional text into Hypertext simply select it and click the right mouse button to bring up the context menu. From this select Action Settings... the function of the text can then be defined as described in the section 4.2. When text has been converted into a hyperlink it is underlined and its colour set to that specified in the slide colour scheme for a hyperlink, once the hyperlink has been followed the colour of the Hypertext will again change to indicate the link has been followed. The colour of the Hypertext links in a document can be changed by choosing the Format menu and selecting Slide Color Scheme...PresentationIntroductionThis chapter explores the practicalities involved in presenting a multimedia presentation. How to transfer your presentation to another computer is described in the first part of the chapter. The second half of the chapter is a brief description of common presentation devices and their relative advantages and disadvantages.Transferring PresentationsThe option provided by Microsoft for making your presentation portable is called Pack and Go, this may be accessed from the File menu. The Pack and Go wizard compresses your presentation, any linked files and, if required, the PowerPoint97 viewer on to floppy disks. To create a Pack and Go presentation choose Pack and Go... from the File menu. This will start a Wizard which will create the packed presentation. In the wizard ensure that the option to include linked files and, if desired, the option to include the viewer are checked. If you have used non-standard screen fonts it may also be a good idea to click the Embed True Type box. The program creates a self extracting program on the first floppy disk. Simply running A:PNGSETUP from the Windows95 Run... menu will decompress and then load the presentation.Before using Pack and Go the links in the document must be up to date, ensure that any files you have inserted into PowerPoint are still in the location where they were originally. If you wish to include the PowerPoint viewer you must have the Office97 or PowerPoint97 CD available or the PowerPoint viewer installed. Alternatively a self-extracting installer can be downloaded from the Microsoft web site at http://www.eu.microsoft.com/powerpoint/internet/viewer/ . If this is installed the Pack and Go wizard will be able to find it. The viewer incorporates all the viewing features of Powerpoint97, however, files cannot be edited with it. Pack and Go can be very time consuming and impractical if your presentation includes large video files. In this case it is best to copy all the files manually from one computer to another. If both machines are networked, FTP is a practical method. For non networked machines consider buying or borrowing a ZIP drive. A ZIP drive is a high capacity floppy disk (100Mb) that plugs into the parallel port of any machine. The drivers provided make connecting the drive a 5-10 minute task. Once the files have been transferred, whichever method has been employed, it is important to check through the presentation playing embedded media files, this will ensure that all the required applications are installed on the target machine. If this seems time consuming consider reaching the highlight of a presentation only to discover that the machine in use cannot play MPEG movies! In addition if the locations of embedded files have changed PowerPoint must be told where to find them. As an object is accessed, for which the file has been moved, a dialog box will appear allowing the file to be located. Presentation DevicesClearly there is little point in creating a multimedia presentation only to print out a series of overhead transparencies. Multimedia presentation require your audience to be able to see a computer display. For all but the smallest groups, or where an interactive presentation is to be browsed by an individual a computer monitor is not a suitable display device. The main types of display available, in descending order of availability and ascending price, are LCD Panels, LCD or MicroMirror projectors and specially equipped lecture theatres.LCD PanelsLCD Panels are quite widely available, they consist of a panel, similar to those used in laptop computers that are placed on an Overhead projector. This allows an image of the computer display to be projectedon to a screen. These panels often incorporate a remote control mouse to allow the speaker to control the presentation without using a keyboard. LCD panels have several disadvantages: They reduce the amount of light transmitted by the projector much more than a transparency , for this reason they work best with modern high intensity OHPs. Even with a good quality OHP it will be necessary to dim the lights for the image to be clearly visible. Resolution is often limited compared to monitors. 640 by 480 panels are widely available and 800 by 600 is becoming available but anything with a higher resolution tends, at the time of writing, towards the prohibitively expensive. It is important to consider display resolution when designing a presentation, fine detail and small text may not be visible on a LCD panel. Persistence can be a problem; their pixels cannot turn on and off as quickly as a monitor and thus moving images appear blurred. Contrast is not as high as a normal display so similar colours may not be easy to distinguish. Using an LCD panel in a large lecture theatre can be impractical as if the projected image is large enough to be clearly visible at a distance it may be too dim to see. In spite of these problems if the presentation is designed with these limitations in mind very satisfactory results may be obtained.ProjectorsThe second type of display device is a projector, in principle this is similar to a slide projector. An LCD projector has a small LCD panel through which high intensity light is projected onto a screen. LCD projectors suffer to a much lesser extent those problems suffered by LCD panels, they are however more expensive. High end projectors use higher quality polycrystalline silicon panels and use a separate panel for each colour, this results in a much better image quality. The newest projector technology employs a Digital MicroMirror Device. This is in effect an array of tiny mirrors that can be moved as to reflect or not reflect light towards the screen. A rotating colour wheel allows the three colour components to be projected in turn, with the wheel removed they have a much higher grayscale contrast than an LCD projector. These projectors are, however, more expensive. Projectors suffer from the same resolution limitations as a LCD panel although here 800 by 600 is standard and some projectors can compress 1024 by 768 onto 800 by 600 with varying results. In general projectors will cope better with moving images and are more suitable for larger rooms. A good quality projector can often be used in a normally lit, although not brightly lit, room. Projectors are becoming more available but are, in general, very expensive, where an LCD panel can cost hundreds of pounds a LCD projector will cost a few thousand.Built in EquipmentSome modern lecture theatres include a built in BARCO projector, or an array of monitors scattered through the hall so every member of the audience has a clear view of a screen. This is usually a much better option than using a portable projector or LCD panel. If you need to demonstrate to a very large group it worth seeing whether such a lecture theatre is available. One point to consider carefully is that only the most modern installations will be able to accept the VGA output from a computer. Older theatres will only accept a standard video signals, although VGA to standard video convertors are available.ConclusionThe most important advice is to test your presentation with the target device to ensure it will appear as you intend and that it will be clearly visible from the back of the room. It can also be a non trivial task setting up an LCD panel, allowing plenty of time and careful perusal of the installation instructions is crucial here. High quality display devices can often be hired if high quality is an imperative for a particular presentation.StyleIntroductionIncorporating Multimedia into a presentation will not distract from it being badly written or poorly planned. Style considerations become more, not less, important with Electronic presentations. This documents does not aim to be a tutorial on presentation design but rather contains some basic rules and suggestions for further reading.Design RulesTextSimply because a presentation incorporates Multimedia doesn’t mean the content of the text on the slides may be neglected. The style rules that have been developed for conventional applications are just as applicable to text in Multimedia Presentaitons. The list below is adapted from Design for Multimedia Presentation pp155:
The use of typefaces is another aspect where caution should be exercised, if in doubt it is probably better to stick to two fonts as using many fonts can look inelegant. A common choice is one sans serif font such as Helvetica or Avant Garde for titles and a serif font, such as Times, for body text. When choosing font sizes it is a good idea to ensure that the text will be large enough to be read from the back of the room. ImagesOne important principle that can be easily applied to the design of a slide is to ensure that it is balanced. A large block of text on one side of a slide should be balanced by a picture or a second column of text. Similarly a banner across the top of a slide should be balanced with a banner on the bottom. When choosing images it is as well to consider that colours will tend to be washed out by chepaer LCD panels, for this reason it is better to use clear images with planety of contrast.MultimediaThe use of Multimedia needs to be considered carefully. Ideally it will draw attention to and emphasise the point the speaker wishes to make. The indiscriminate use of background sounds and animations can have entirely the opposite effect. If in doubt the maxim ‘As little as possible and as much as necessary’ is a reasonable starting point. The limitations of the equipment should also be considered. Full motion video may look blurred on all but the most expensive projectors, and a tinny rendition may reduce the impact of even the most evocative background music.Further Reading and Web LinksThe following is a list of some suggested reading for those who wish to take a more sophisticated approach:Boyle T, Design for Multimedia Learning, Prentice Hall 1997. This is a useful reference on most aspects of creating Multimedia presentations for learning. Multimedia Presentations workshop held under the auspices of the Support Initiative for Multimedia Applications. This includes a defence of traditional ‘Talk and Chalk’ methods. A searchable database of multimedia file formats which may be of use in loacating a converter for an obscure type and for further information on the relative merits of different file types. Glossary
| |||||||||||||||||||||||||||||||||||||||||||||
Graphics Multimedia Virtual Environments Visualisation Contents